Manage client and vendor Accounts in XactRemodel
 Updated
by Russell B.
Updated
by Russell B.
The accounts section stores information for all your clients and vendors. With the ability to associate multiple contacts, keep detailed notes, and link relevant projects.
![]() Client and vendor accounts are limited to XactRemodel Pro and XactRestore Pro subscription levels. To upgrade your subscription, contact our PropTech Sales Department by calling 833-352-9228 between 7 AM and 5 PM (Mountain Time), Monday - Friday.
Client and vendor accounts are limited to XactRemodel Pro and XactRestore Pro subscription levels. To upgrade your subscription, contact our PropTech Sales Department by calling 833-352-9228 between 7 AM and 5 PM (Mountain Time), Monday - Friday.
Clients
Create client accounts
Follow the steps below to create client accounts from the accounts section.
Note: You can create accounts directly within a project or, for XactRestore subscribers, via the lead creation form.
- Within XactRemodel or XactRestore, select Accounts.
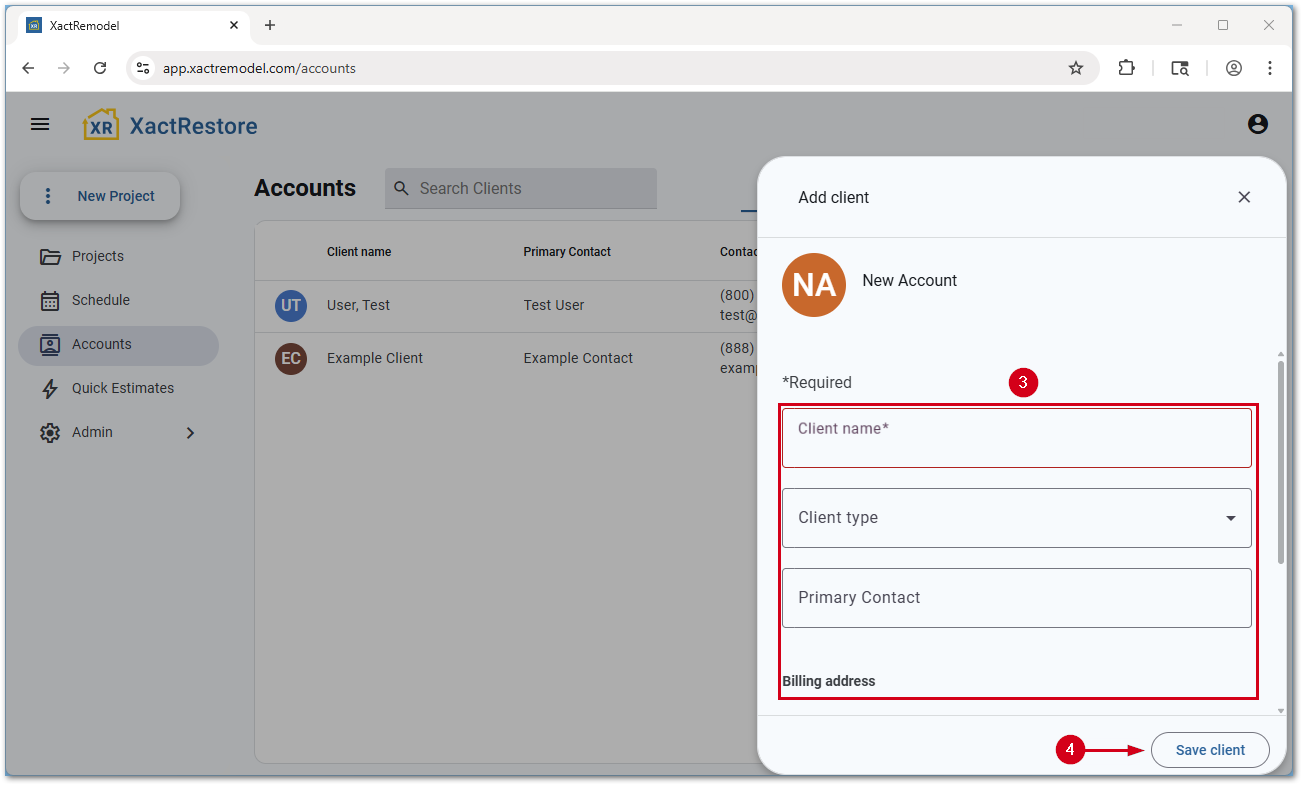
- Select Add client.
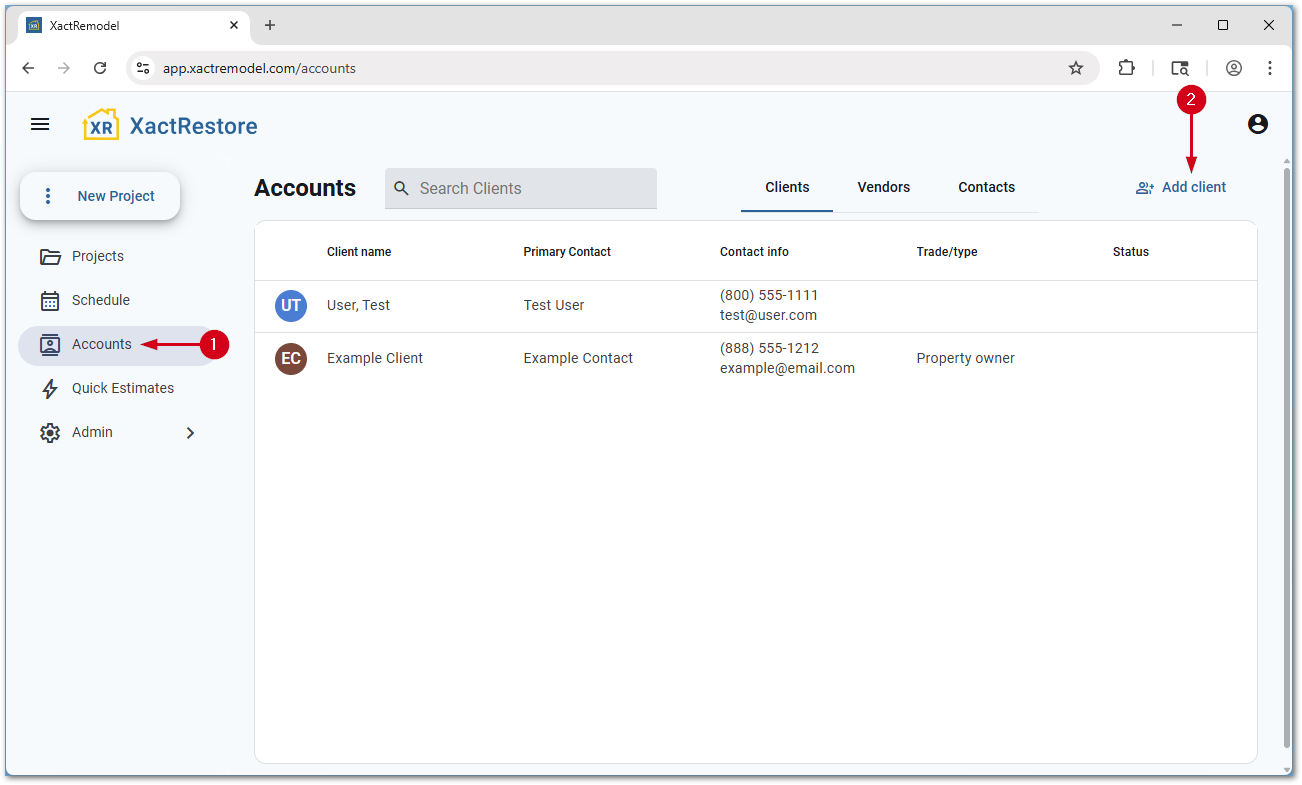
- Fill out the form.
- Client name: Enter the client’s name.
- Client type: Select the client type.
Note: If desired, you can select multiple client types.
- Primary Contact: Select the primary contact or quickly add a new contact.
- Billing address: Enter the billing address for the contact.
- Select Save client.
Note: If desired, you can enter a separate physical address before saving.
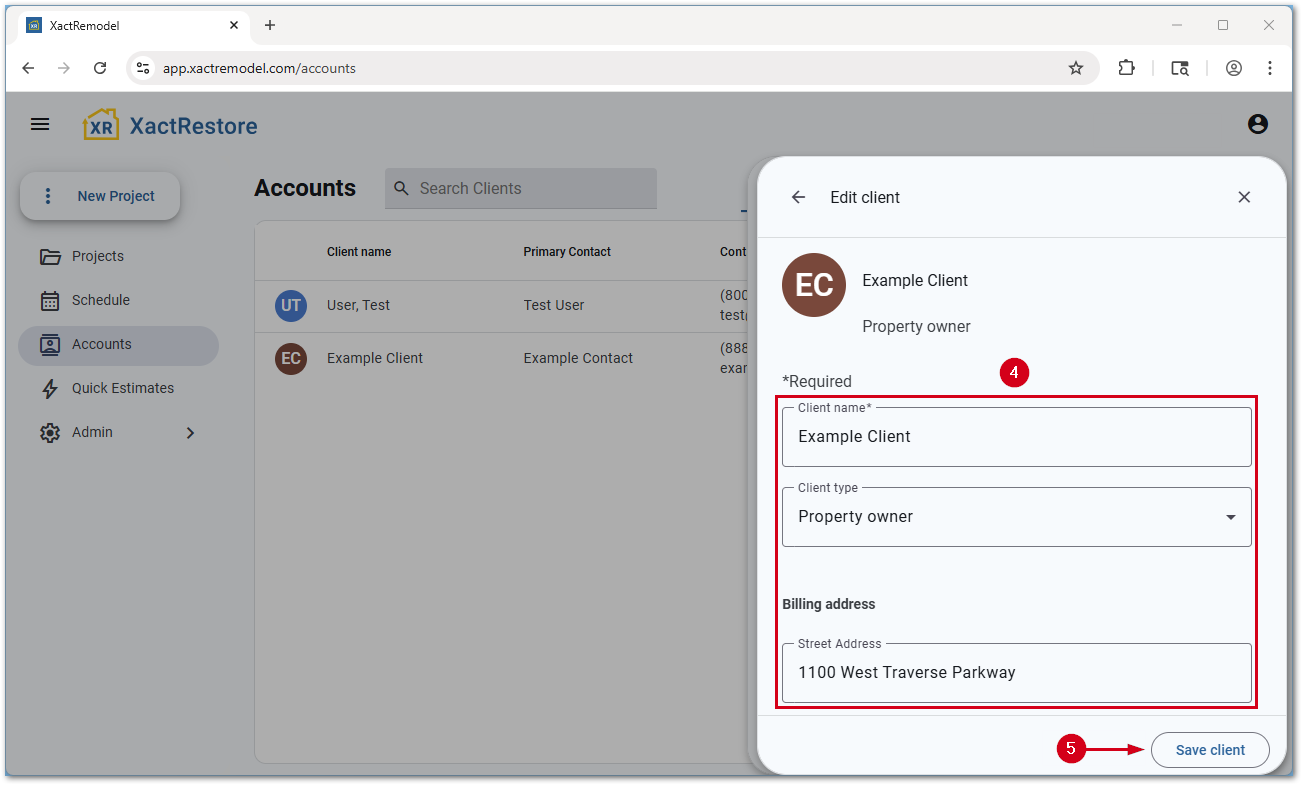
Edit client accounts
Follow the steps below to edit existing client accounts.
- Within XactRemodel or XactRestore, select Accounts.
- Select the desired client account.

- Select the Edit client icon.

- Make any desired changes.
- Select Save client.
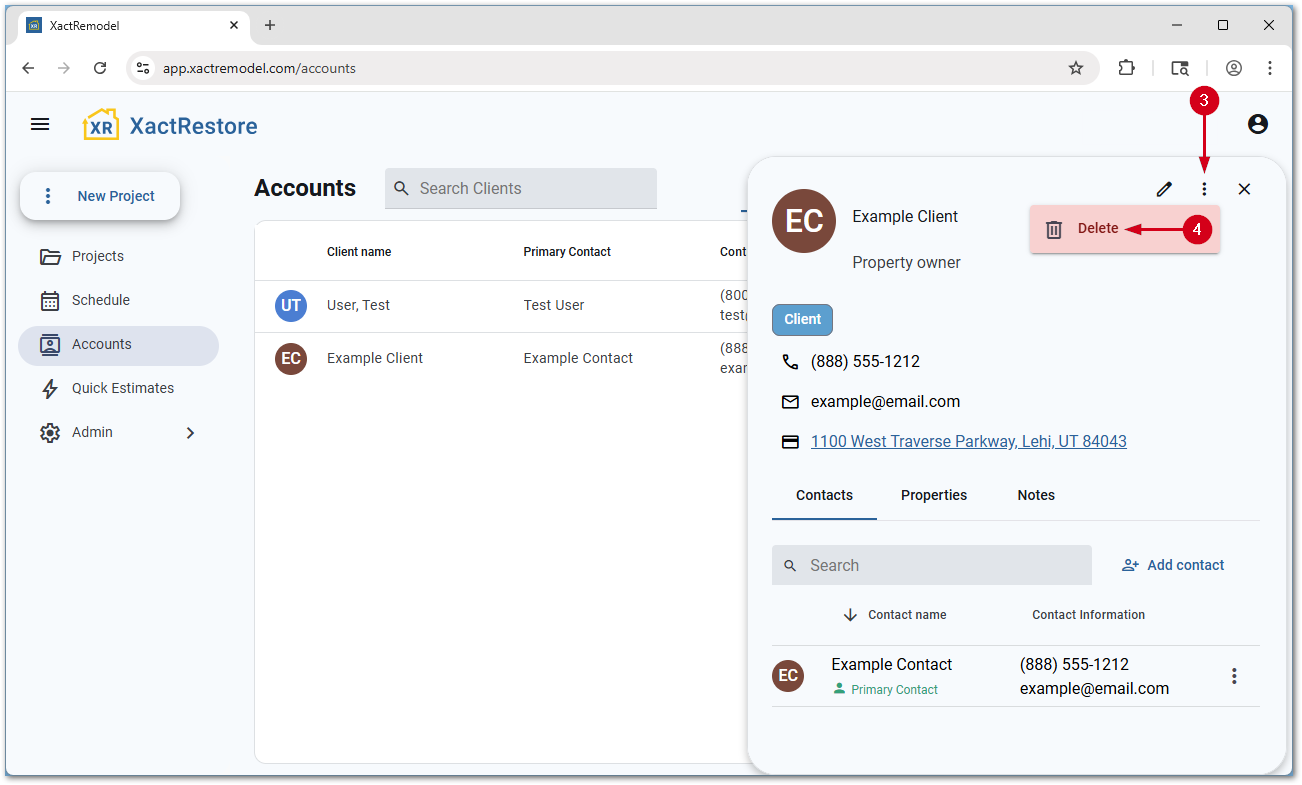
Delete client accounts
Follow the steps below to delete existing client accounts.
- Within XactRemodel or XactRestore, select Accounts.
- Select the desired client account.
- Select the menu icon.
- Select Delete. The account is deleted with no confirmation prompt.
IMPORTANT: A brief message with an undo option appears at the bottom of the page once an account is deleted. When the popup disappears, the account is no longer recoverable.
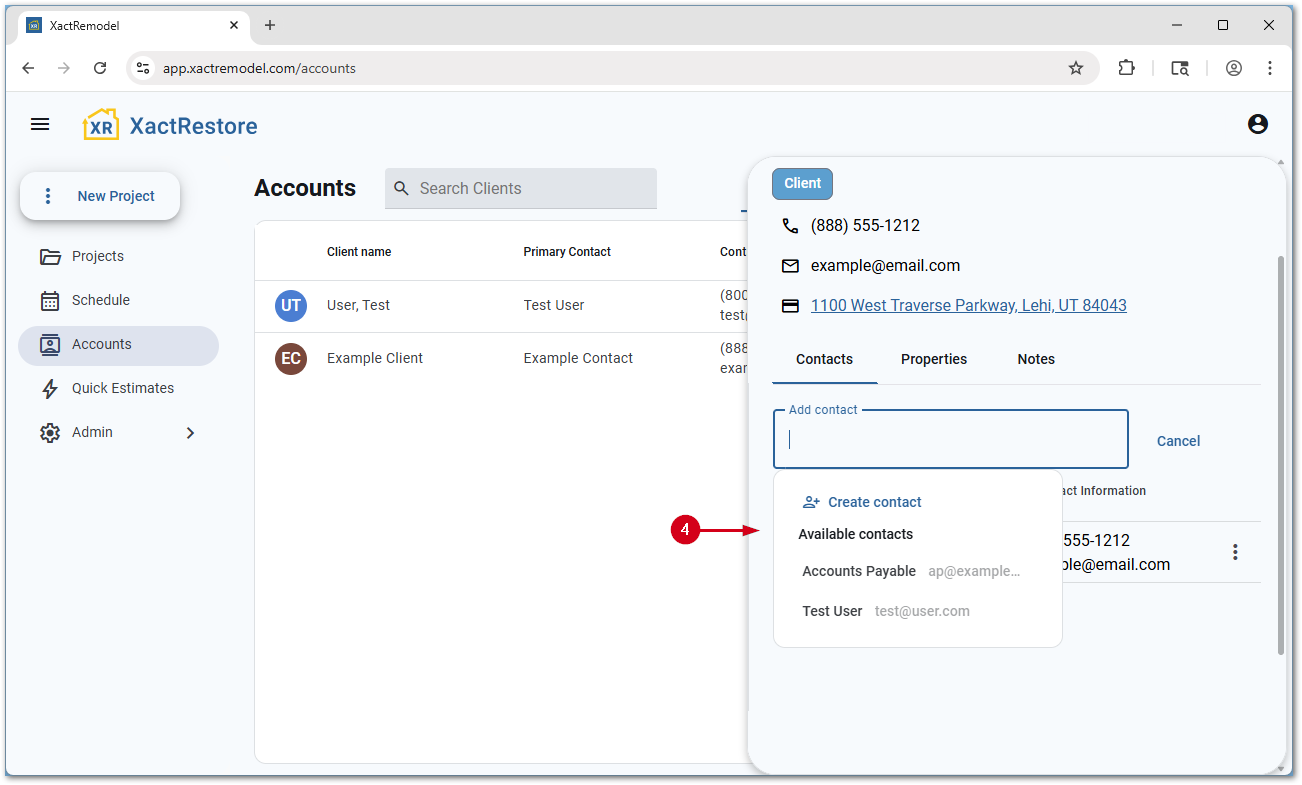
Associate contacts with client accounts
Follow the steps below to associate contacts with client accounts.
- Within XactRemodel or XactRestore, select Accounts.
- Select the desired client account.
- Select Add contact.
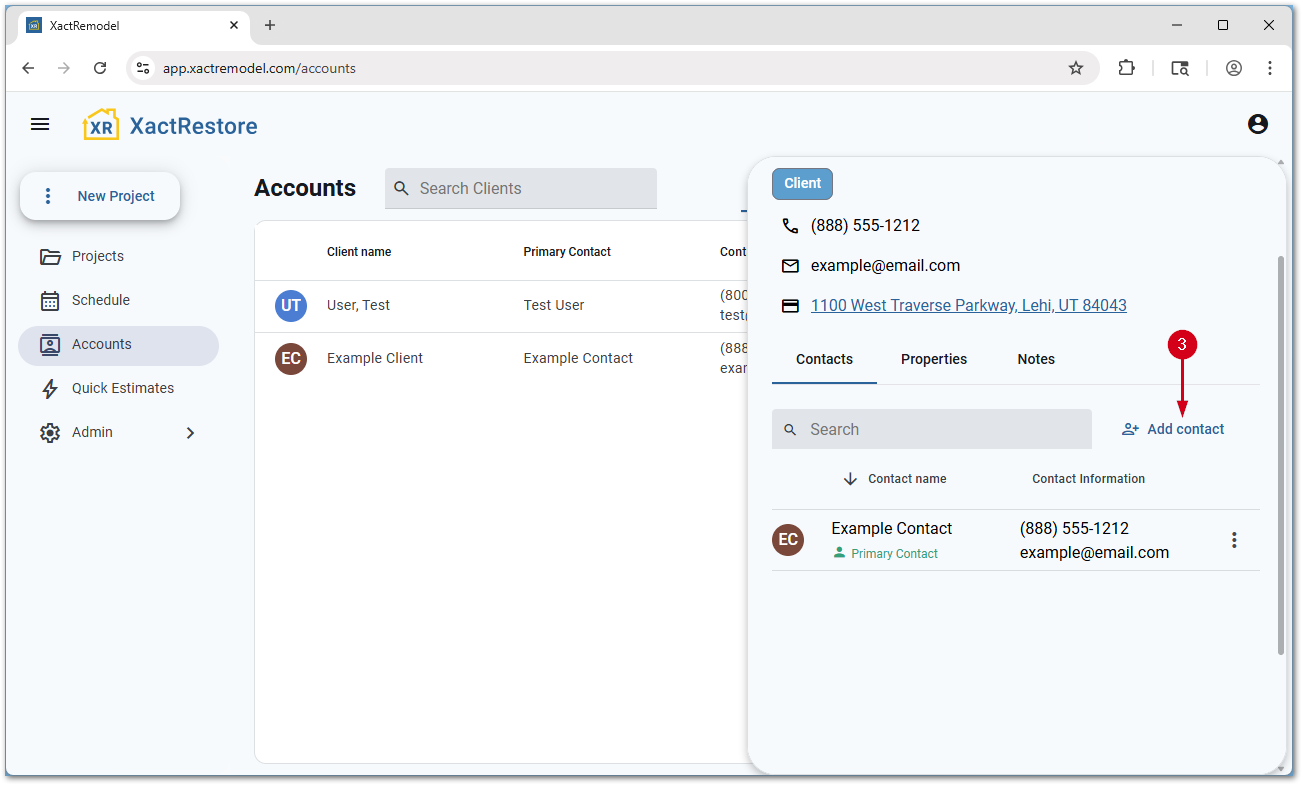
- Select an existing contact from the drop-down menu, search for a contact, or select Create contact.
Note: Selecting Create contact opens a new section to allow you to create a contact. Otherwise, selecting an existing contact associates them with the client account.
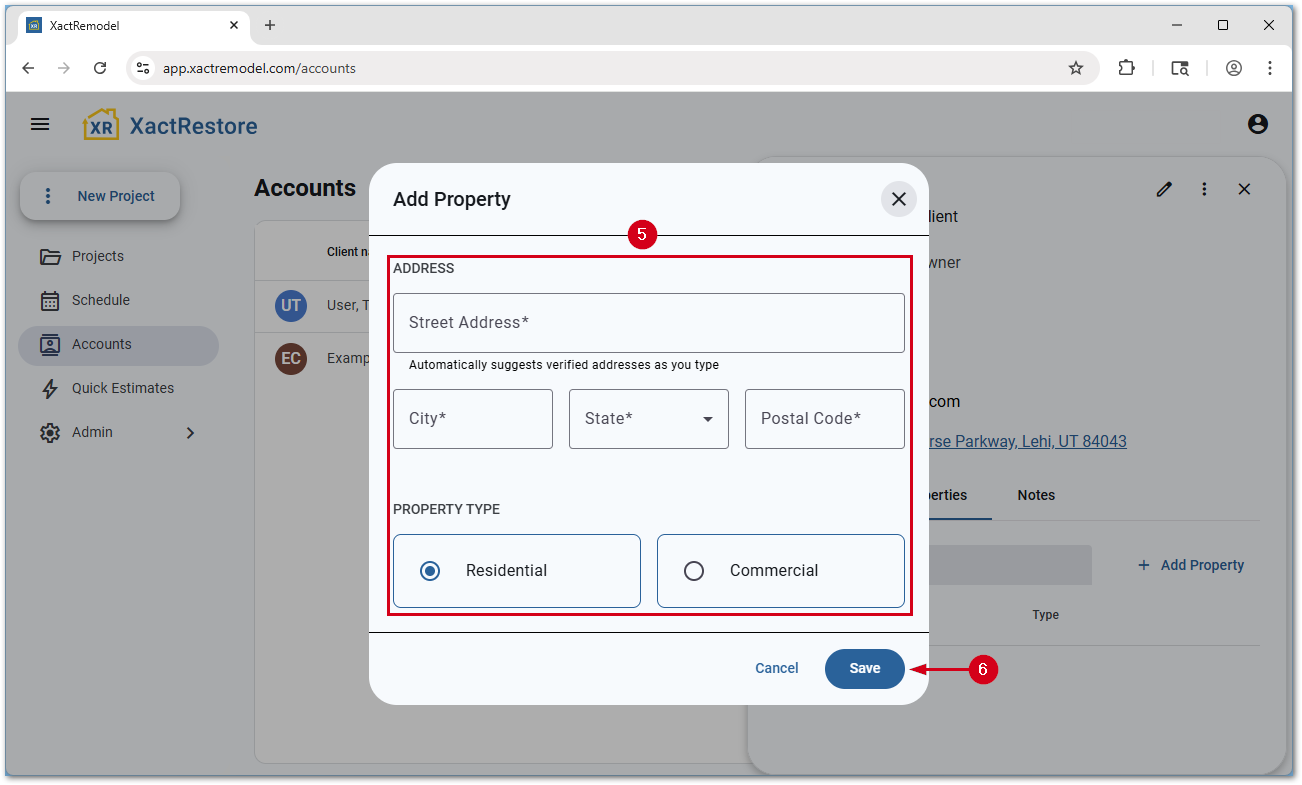
Associate properties with client accounts
Follow the steps below to associate properties with client accounts.
- Within XactRemodel or XactRestore, select Accounts.
- Select the desired client account.
- Select Properties.
- Select Add Property.
Note: To edit an existing property, select the menu icon next to an existing property and select Edit. Once added, an address cannot be deleted from a client account.
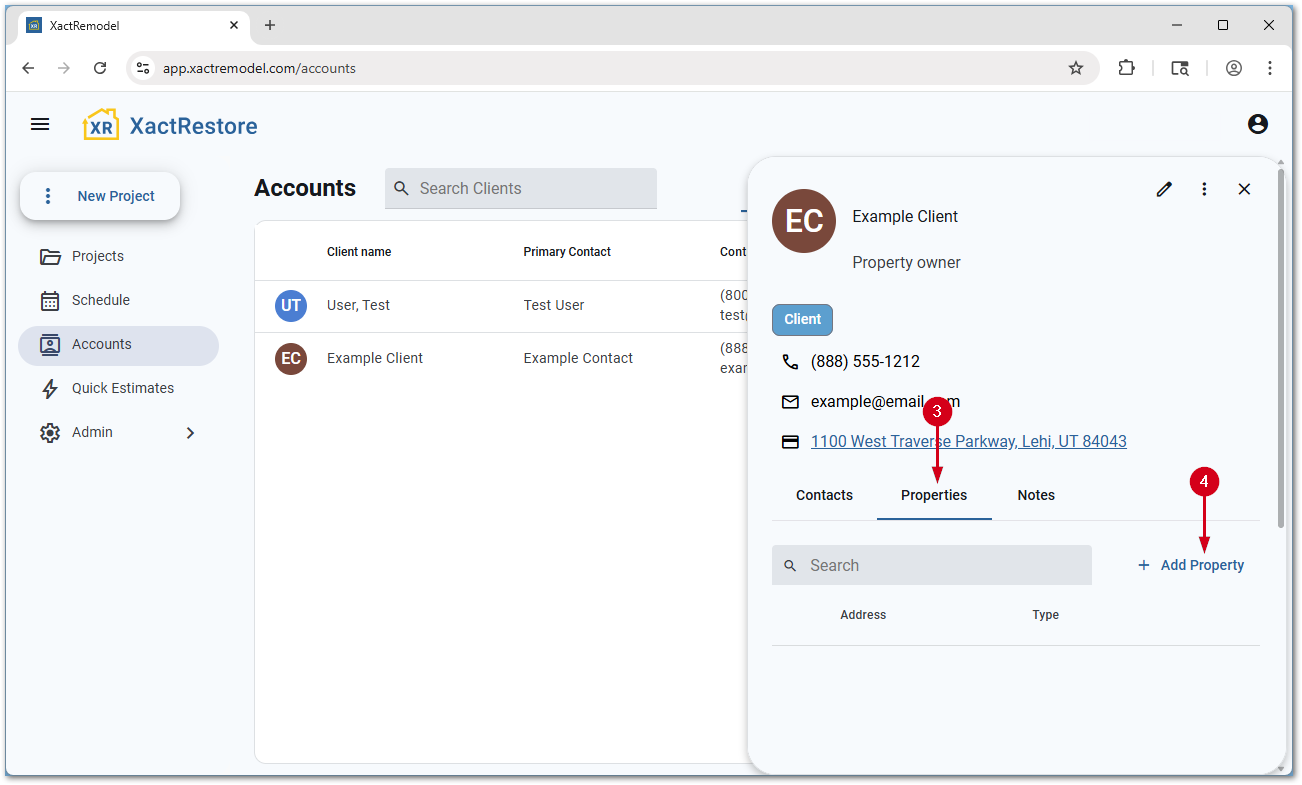
- Fill out the form.
- Select Save.
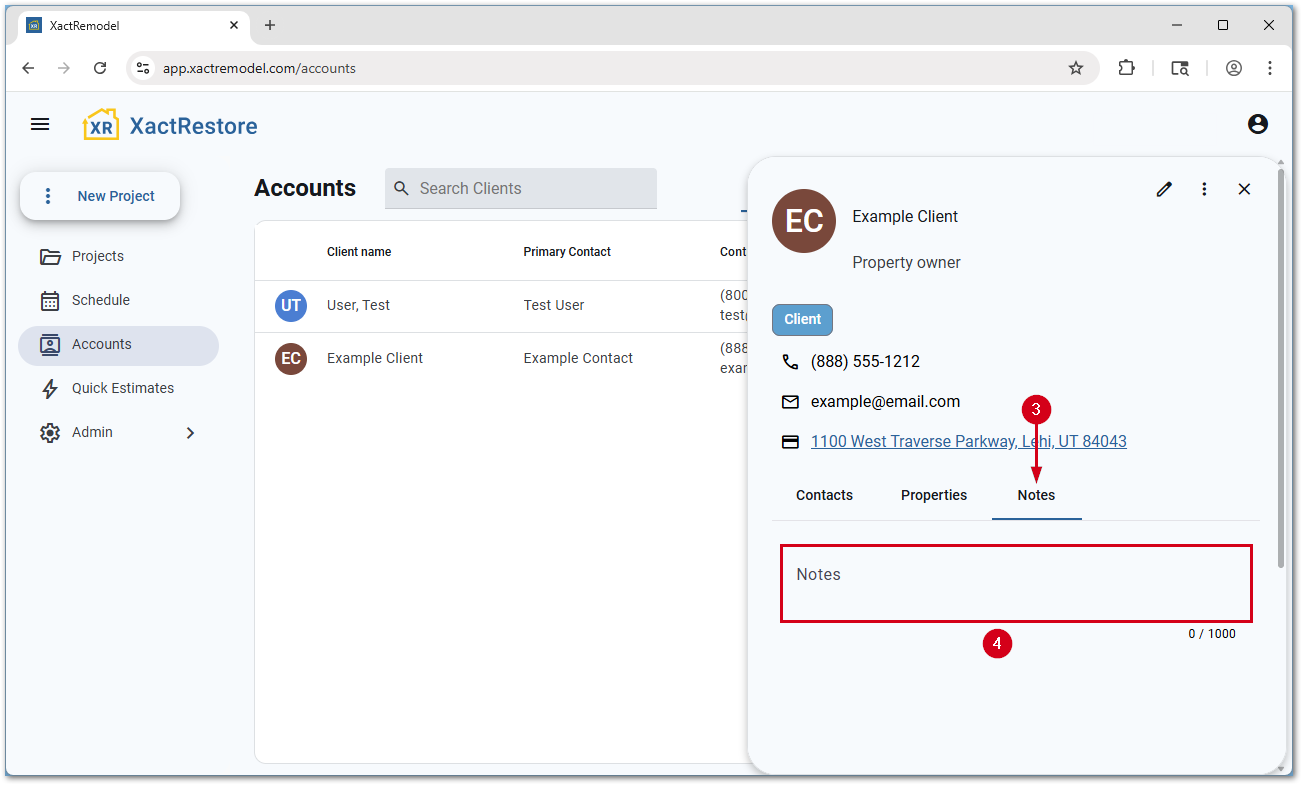
Add notes about client accounts
Follow the steps below to add internal notes about client accounts.
- Within XactRemodel or XactRestore, select Accounts.
- Select the desired client account.
- Select Notes.
- Enter any desired notes. The notes automatically save when you select or tab away from the field.
Vendors
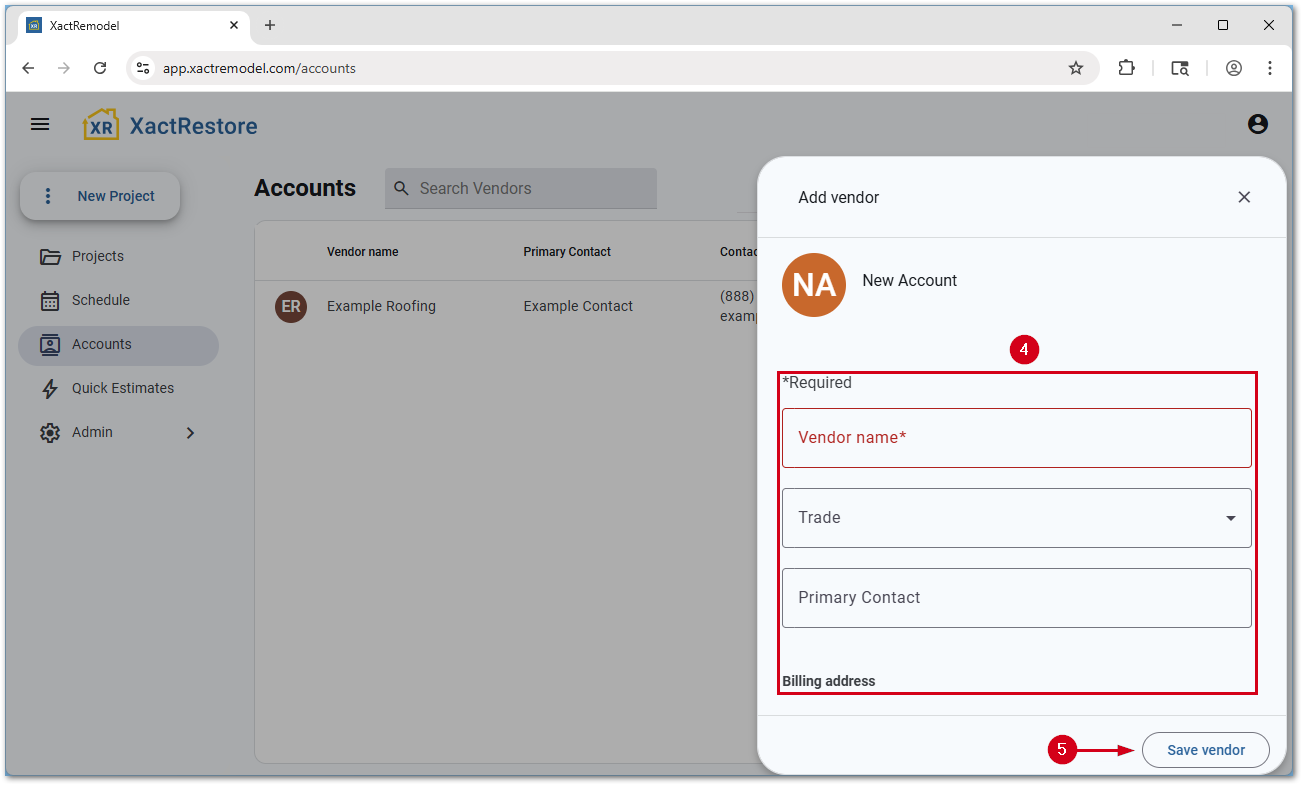
Create vendor accounts
Follow the steps below to create new vendor accounts.
- Within XactRemodel or XactRestore, select Accounts.
- Select Vendors.
- Select Add vendor.
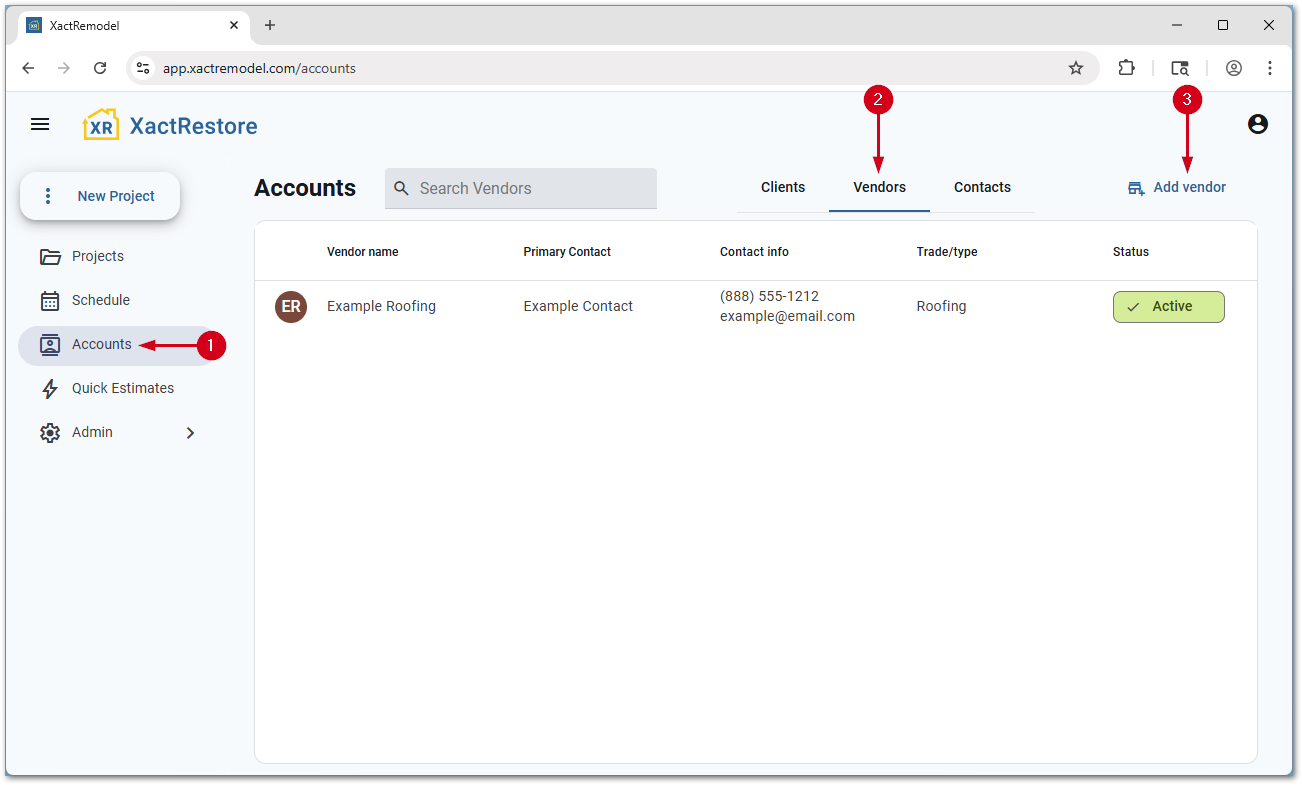
- Fill out the form.
- Vendor name: Enter the vendor’s name.
- Trade: Select any appropriate trades.
- Primary Contact: Select an existing contact from the drop-down menu, search for a contact, or select Create contact.
Note: Selecting Create contact opens a new section to allow you to create a contact. Otherwise, selecting an existing contact associates them with the client account.
- Billing address: Enter the billing address for the vendor.
- URL: Enter the vendor’s website address.
- Select Save vendor.
Note: If desired, you can enter a separate physical address before saving.
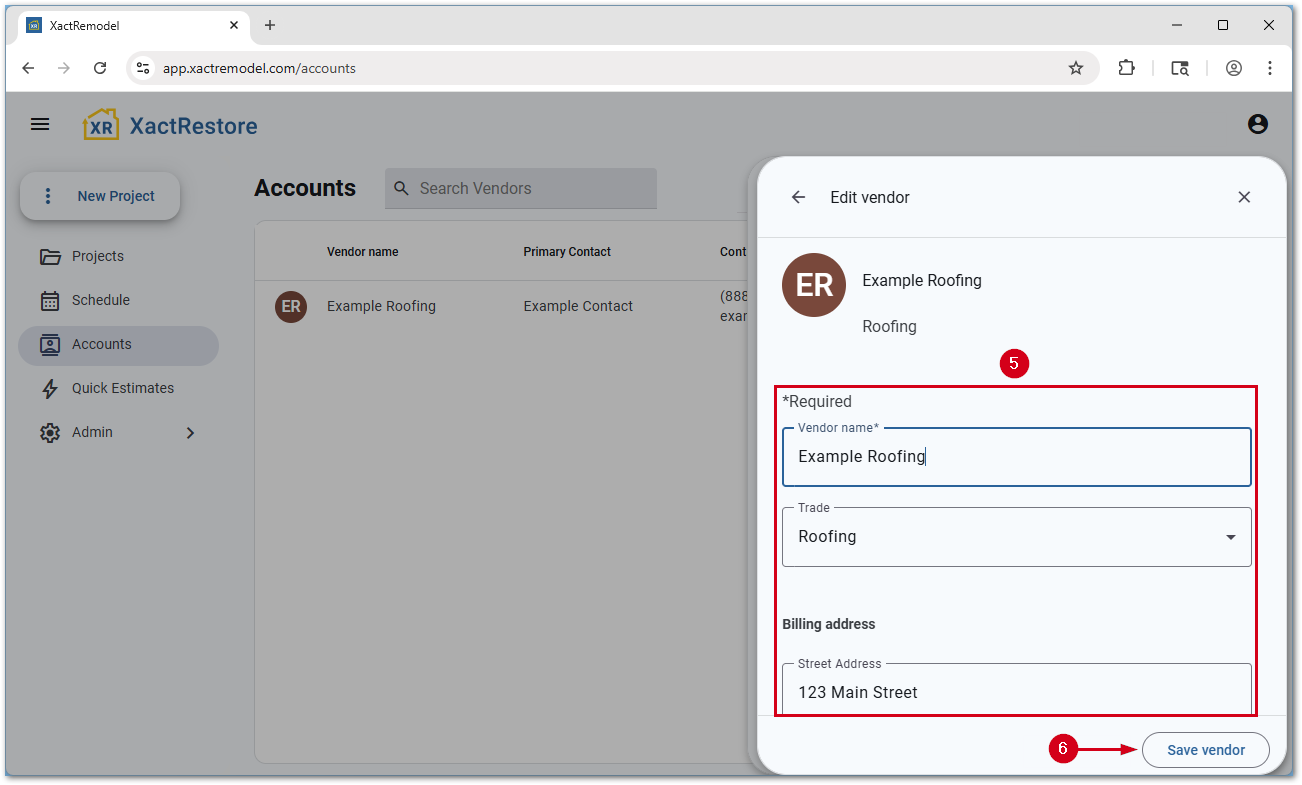
Edit vendor accounts
Follow the steps below to edit existing vendor accounts.
- Within XactRemodel or XactRestore, select Accounts.
- Select Vendors.
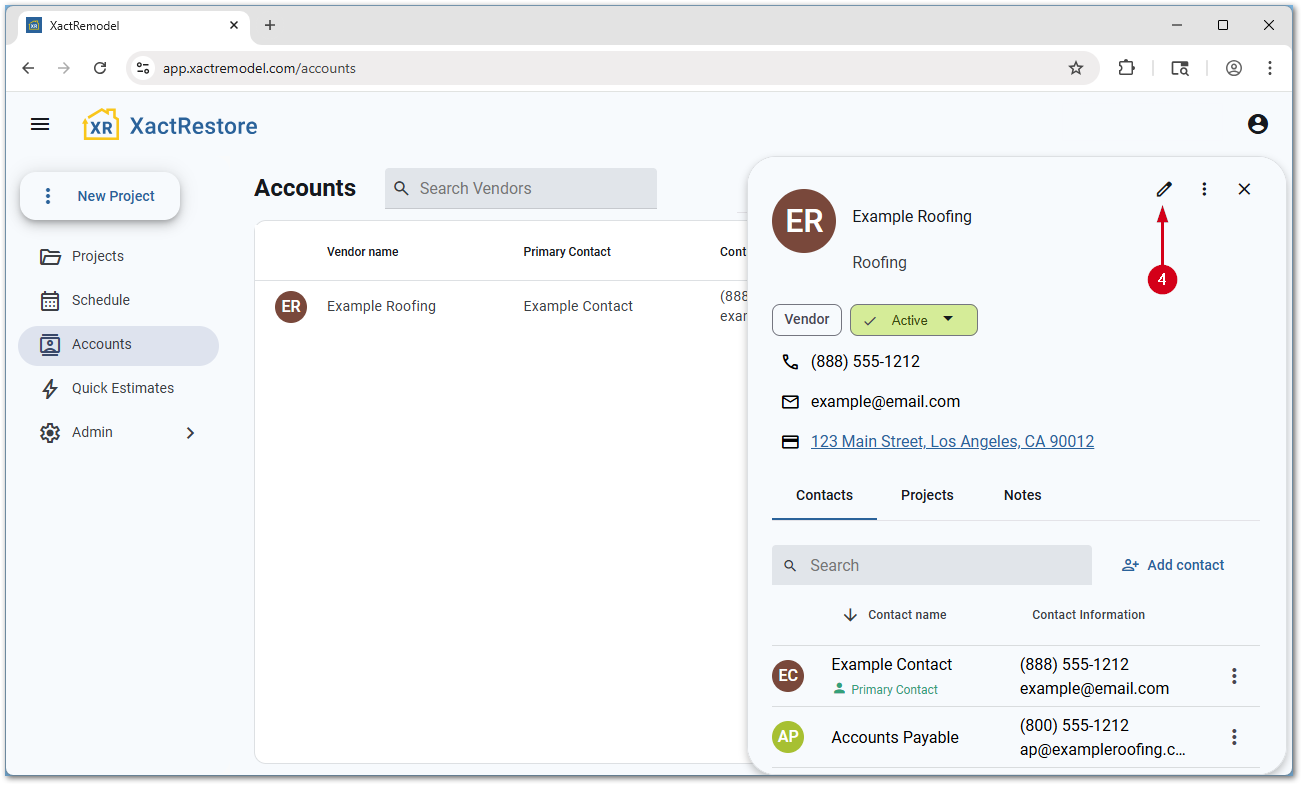
- Select the desired vendor.
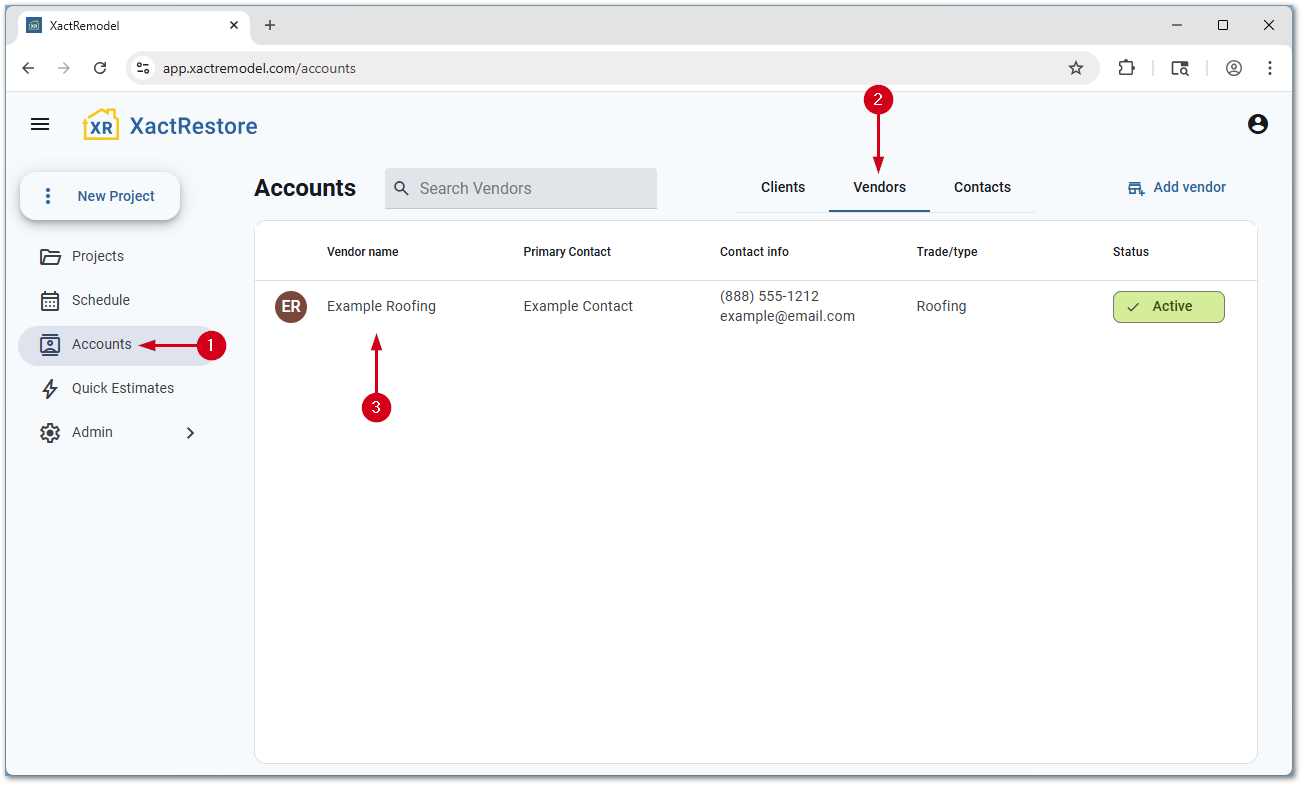
- Select the Edit vendor icon.
- Make any desired changes.
- Select Save vendor.
Delete vendor accounts
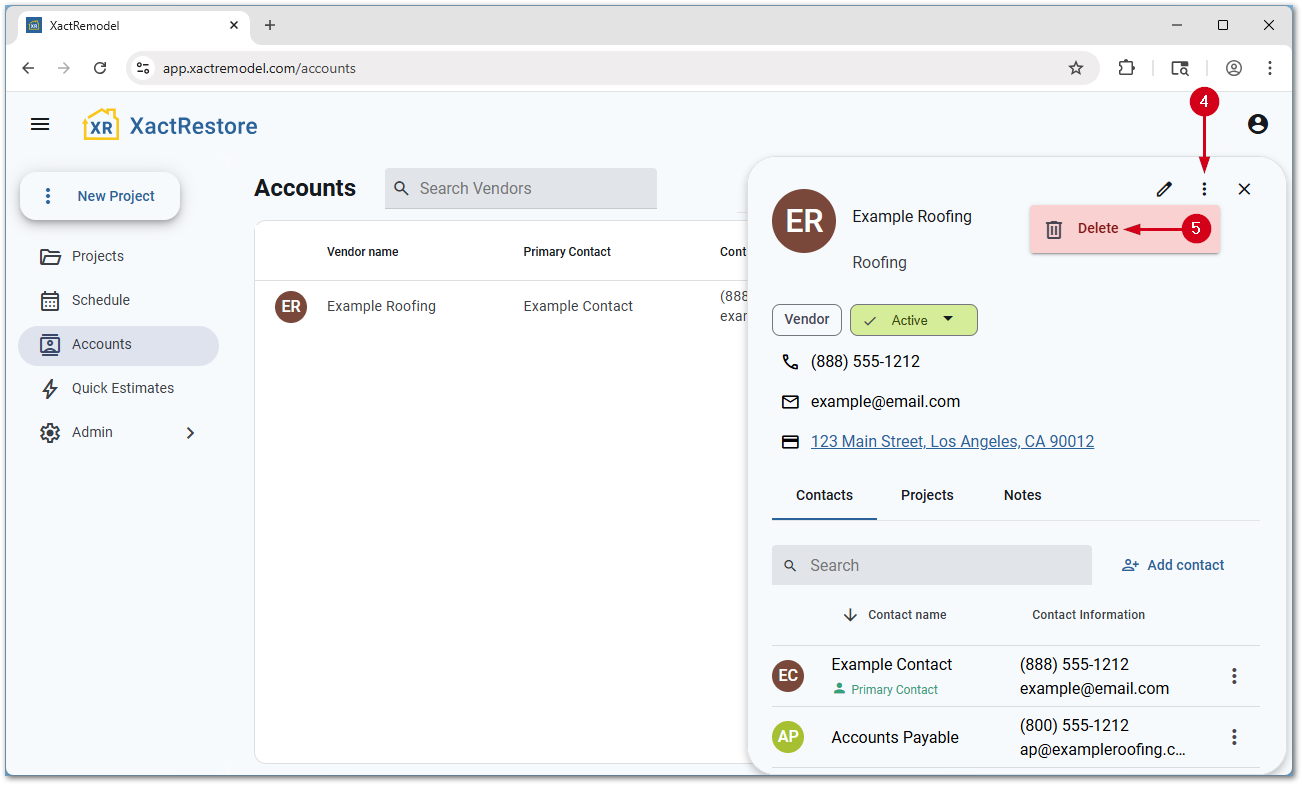
Follow the steps below to delete vendor accounts.
- Within XactRemodel or XactRestore, select Accounts.
- Select Vendors.
- Select the desired vendor.
- Select the menu icon.
- Select Delete. The account is deleted with no confirmation prompt.
IMPORTANT: A brief message with an undo option appears at the bottom of the page once an account is deleted. When the popup disappears, the account is no longer recoverable.
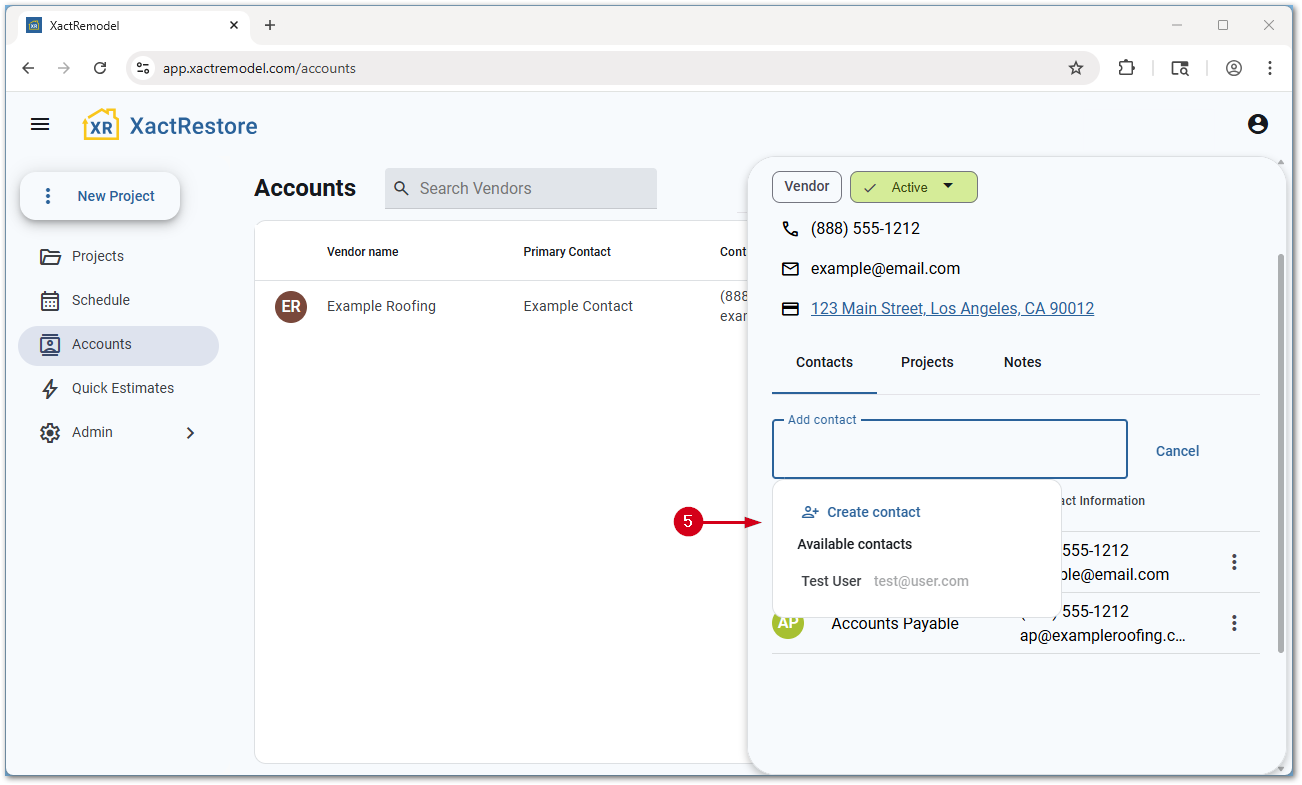
Associate contacts with vendor accounts
Follow the steps below to associate contacts with vendor accounts.
- Within XactRemodel or XactRestore, select Accounts.
- Select Vendors.
- Select the desired client account.
- Select Add contact.
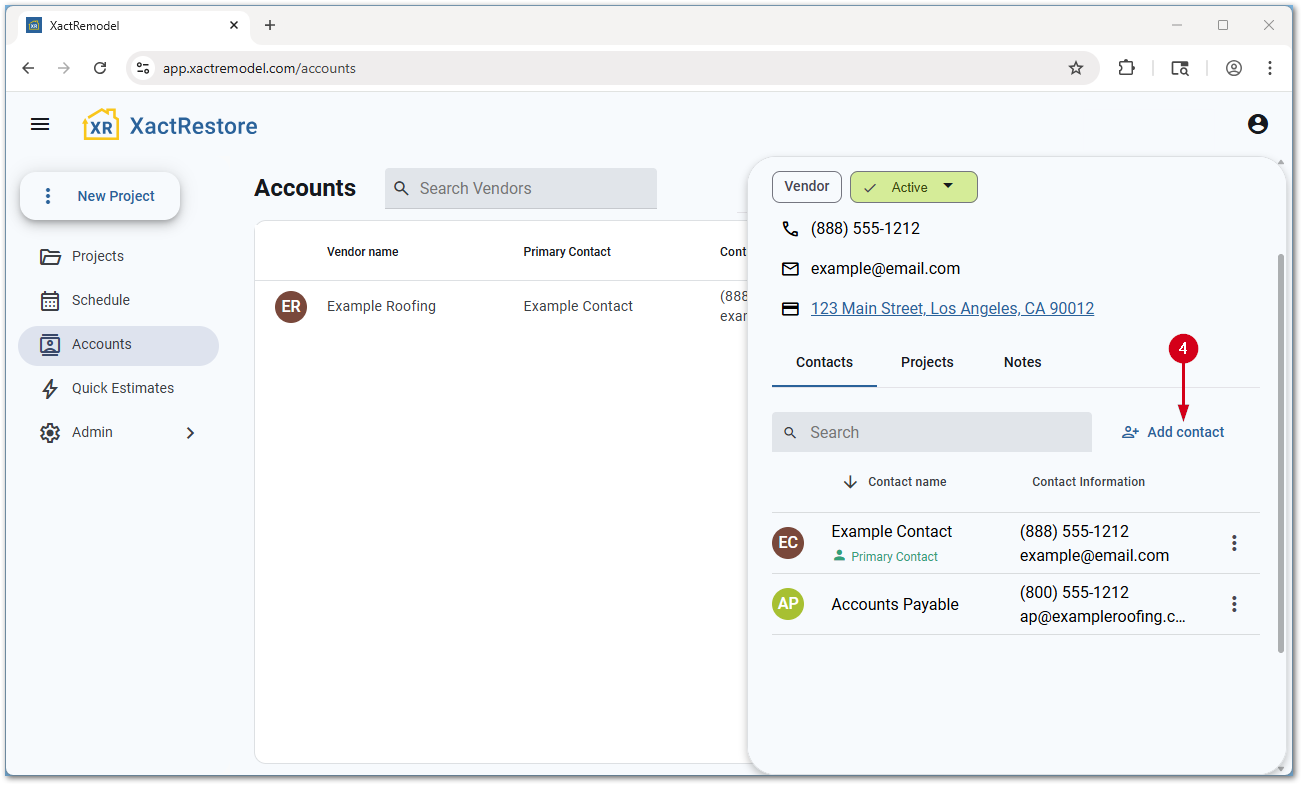
- Select an existing contact from the drop-down menu, search for a contact, or select Create contact.
Note: Selecting Create contact opens a new section to allow you to create a contact. Otherwise, selecting an existing contact associates them with the client account.
View projects associated with vendor accounts
Follow the steps below to view projects associated with vendor accounts.
- Within XactRemodel or XactRestore, select Accounts.
- Select Vendors.
- Select the desired client account.
- Select Projects.
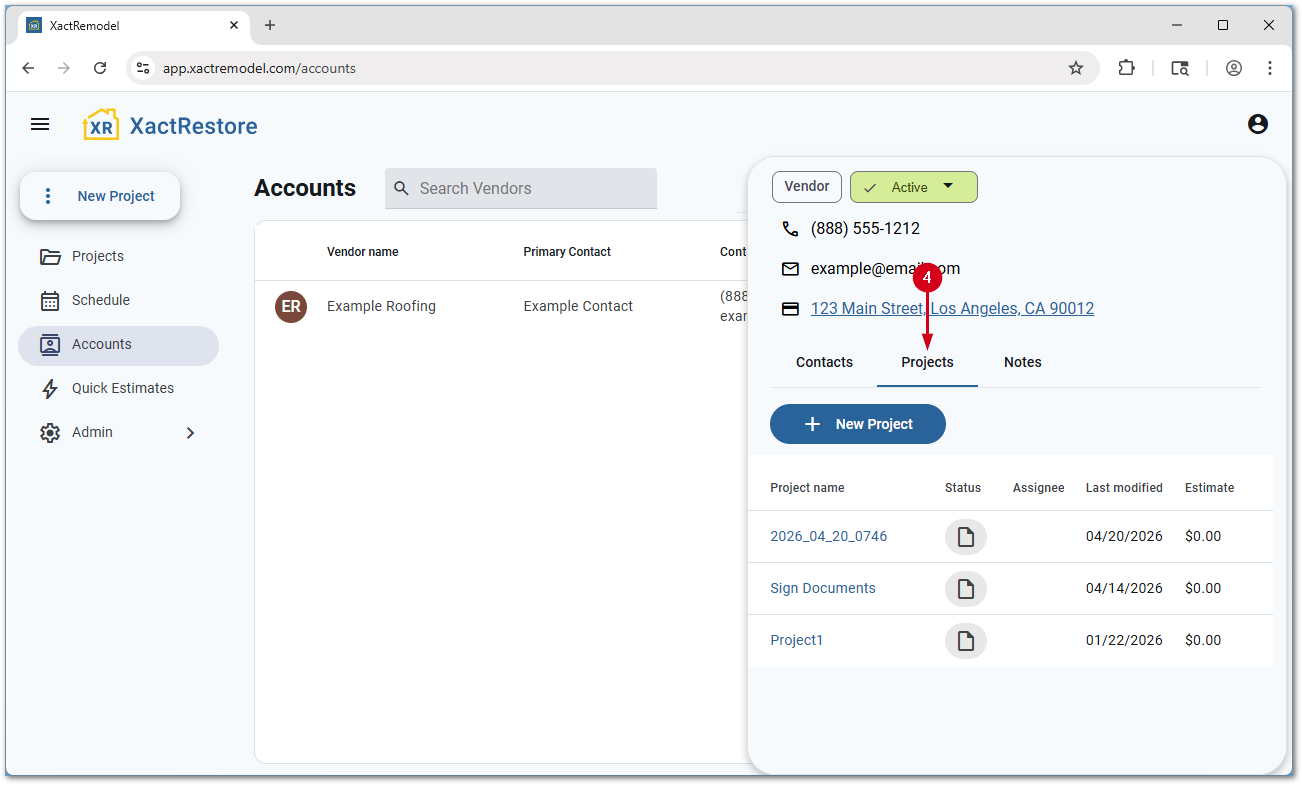
A list of all associated projects displays, and, if desired, you can select New Project to create a new project associated with the project.
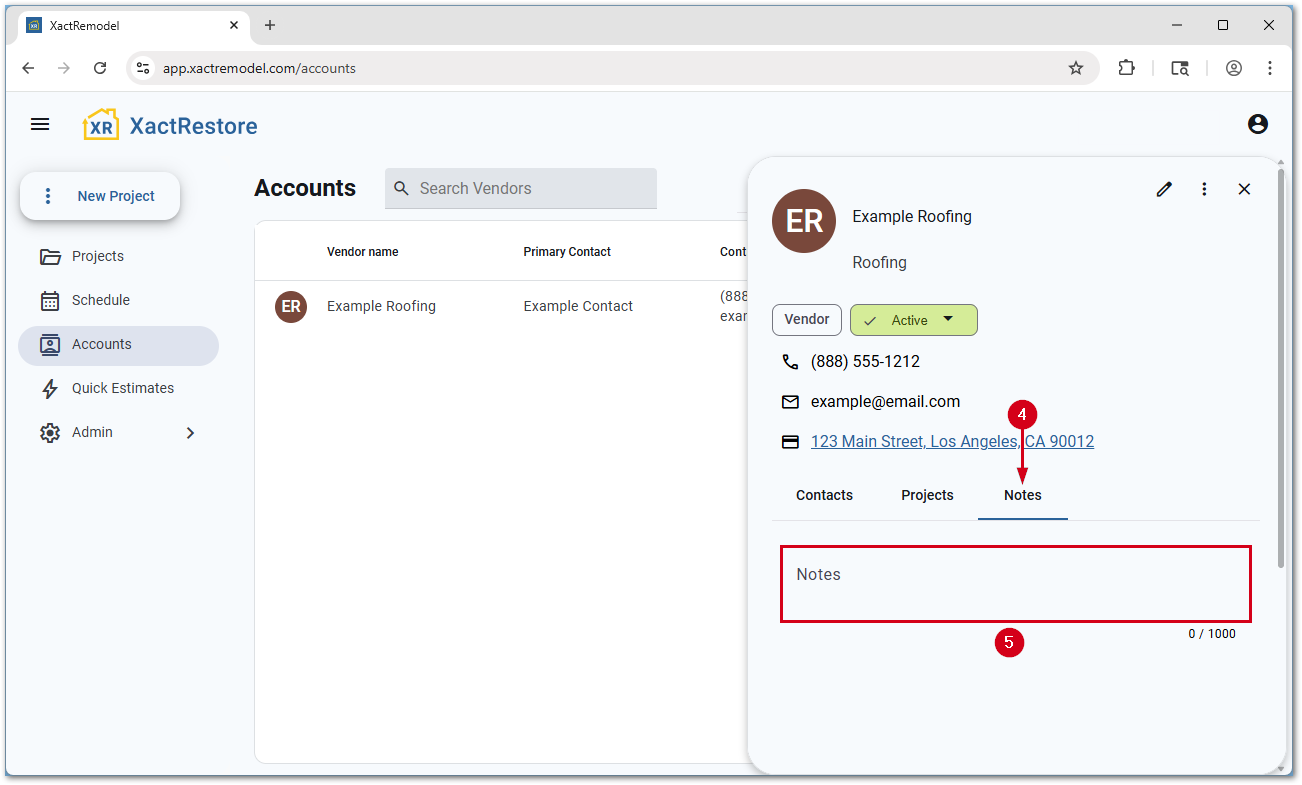
Add notes about vendor accounts
Follow the steps below to add internal notes associated with vendor accounts.
- Within XactRemodel or XactRestore, select Accounts.
- Select Vendors.
- Select the desired client account.
- Select Notes.
- Enter any desired notes. The notes automatically save when you select or tab away from the field.
Contacts
Add contacts
Follow the steps below to add new contacts.
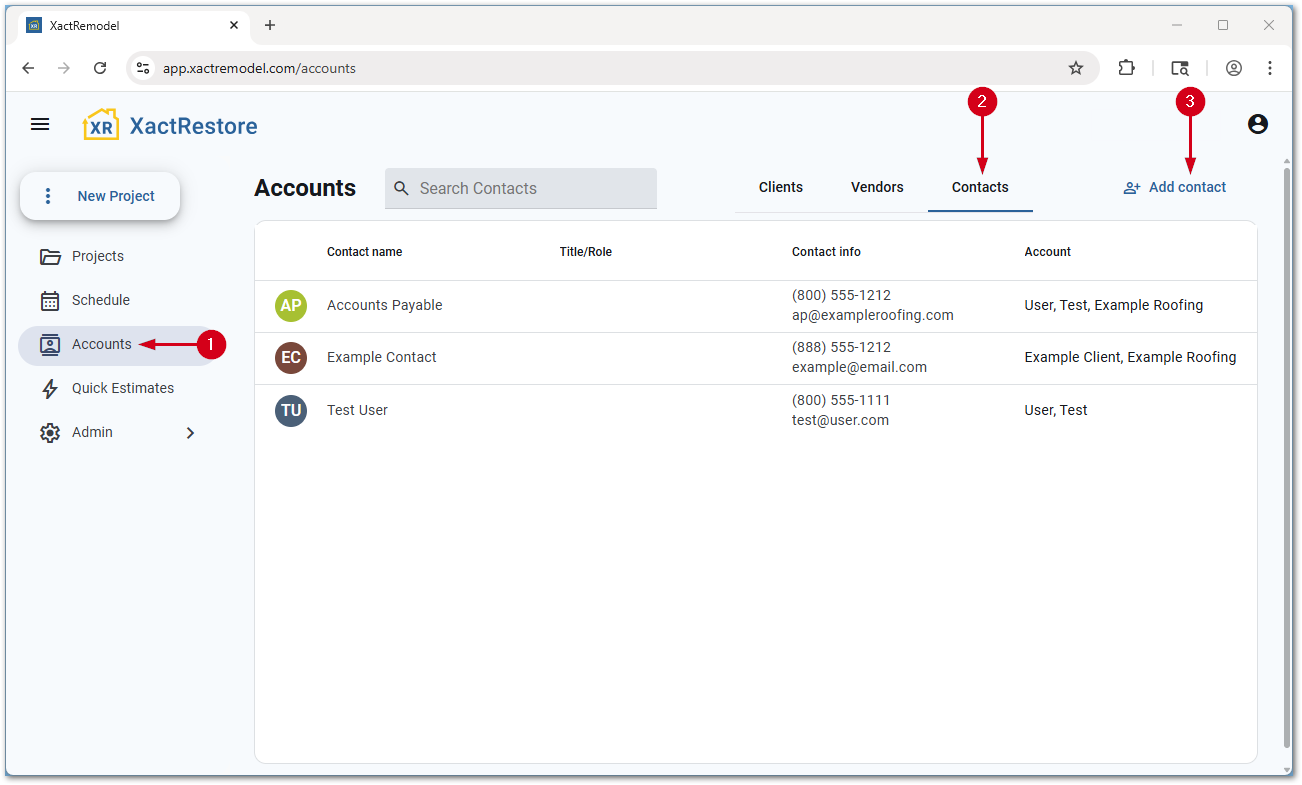
- Within XactRemodel or XactRestore, select Accounts.
- Select Contacts.
- Select Add contact.
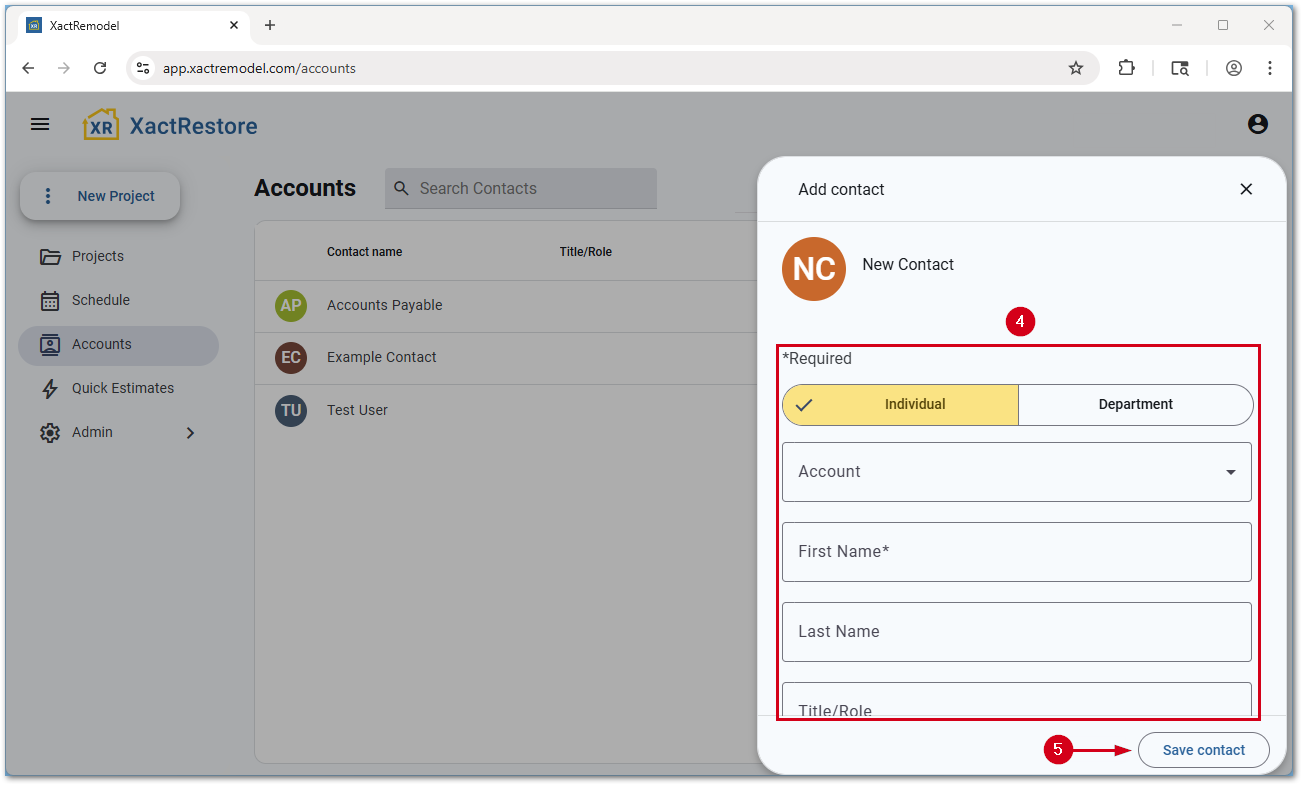
- Fill out the form.
- Individual or Department: Set if this is an individual or a department (i.e. Accounting, etc.)
- Account: Select the appropriate client or vendor account with which to associate the contact
- First Name: The contact’s first name
- Last Name: The contact’s last name
- Title/Role: The contact’s title
Note: When creating department contacts, this field is not available.
- Phone: The client’s phone number and number type
- Email: The client’s email address
- Select Save contact.
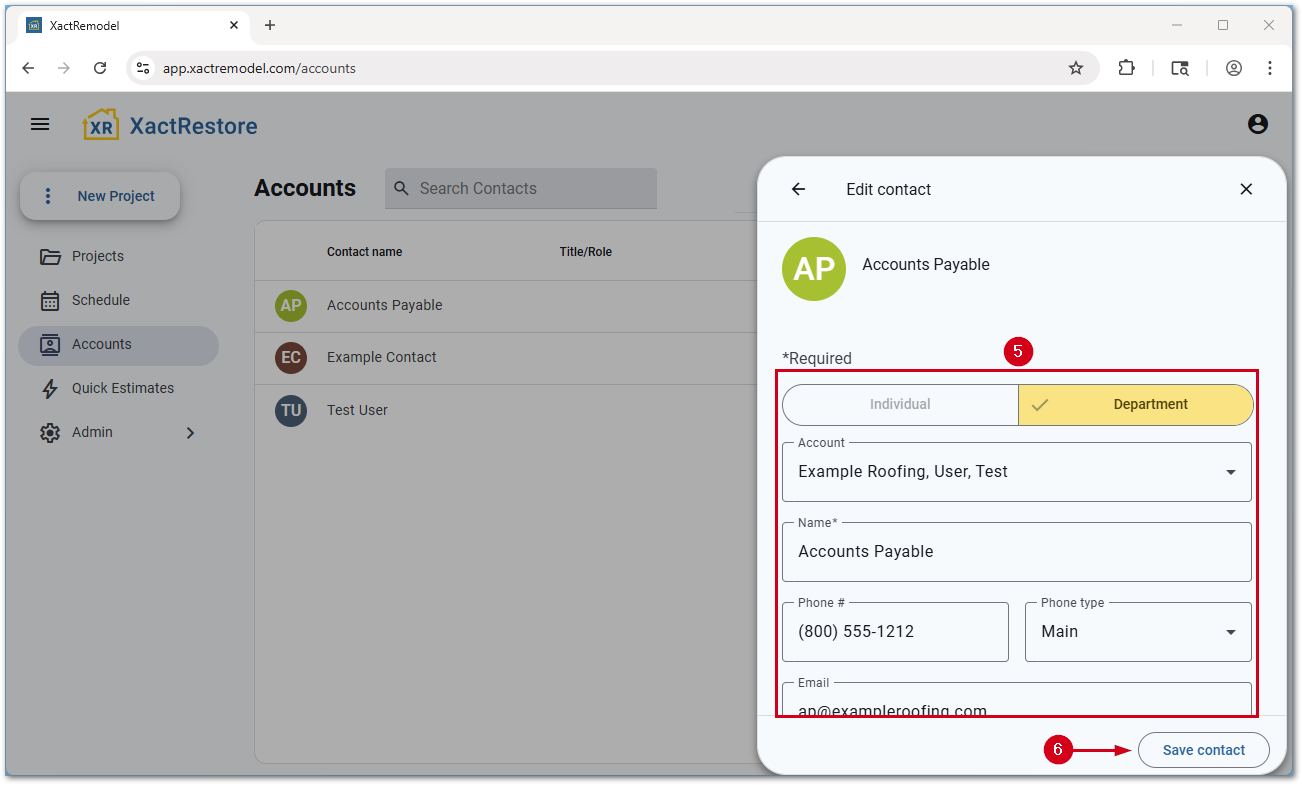
Edit contacts
Follow the steps below to edit contacts.
- Within XactRemodel or XactRestore, select Accounts.
- Select Contacts.
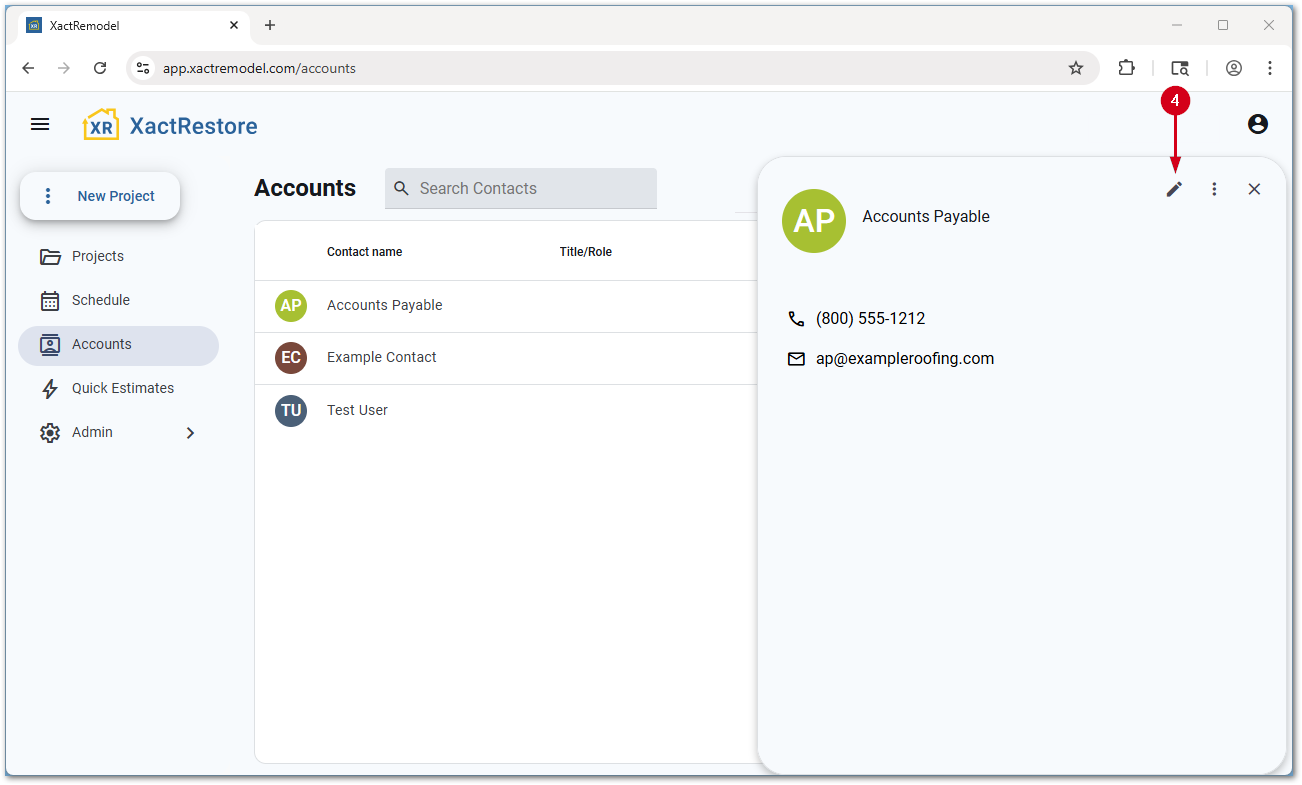
- Select the desired contact.
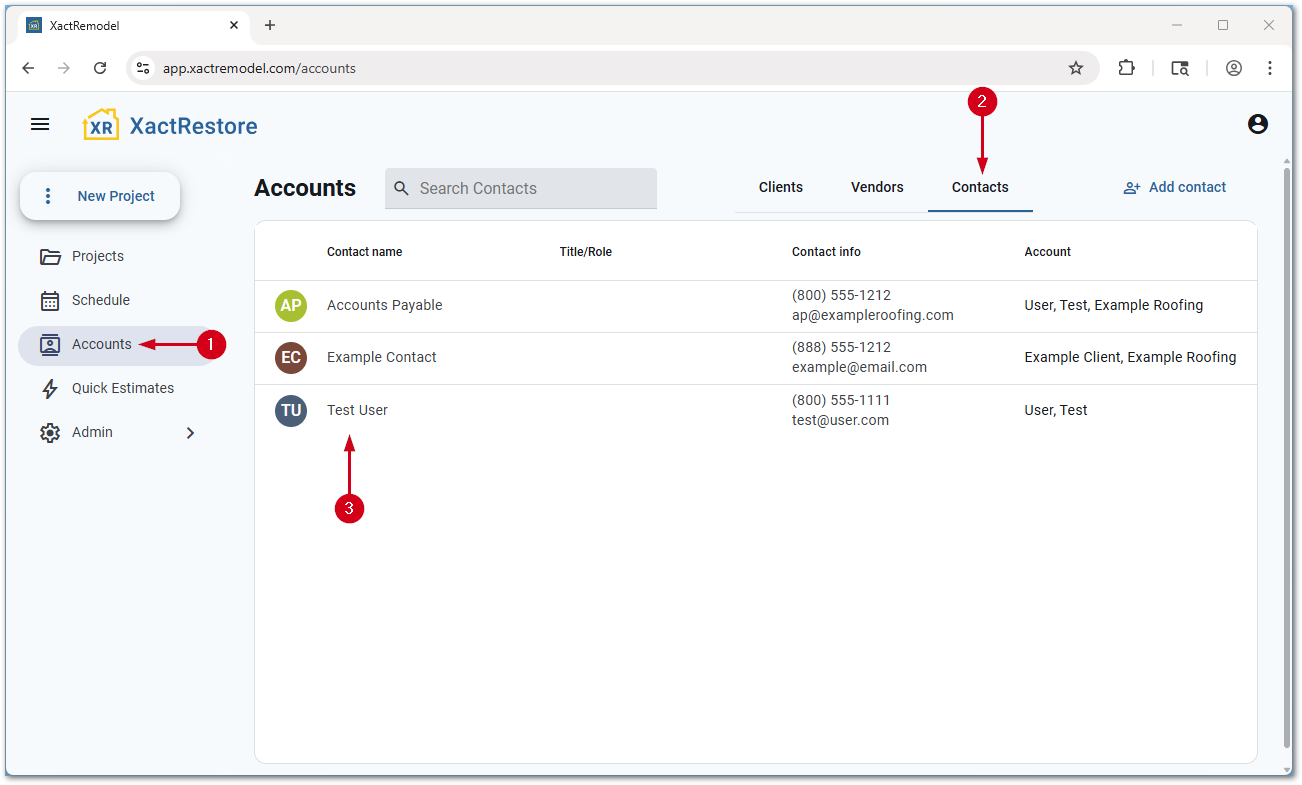
- Select the Edit contact icon.
- Make any desired changes.
- Select Save contact.
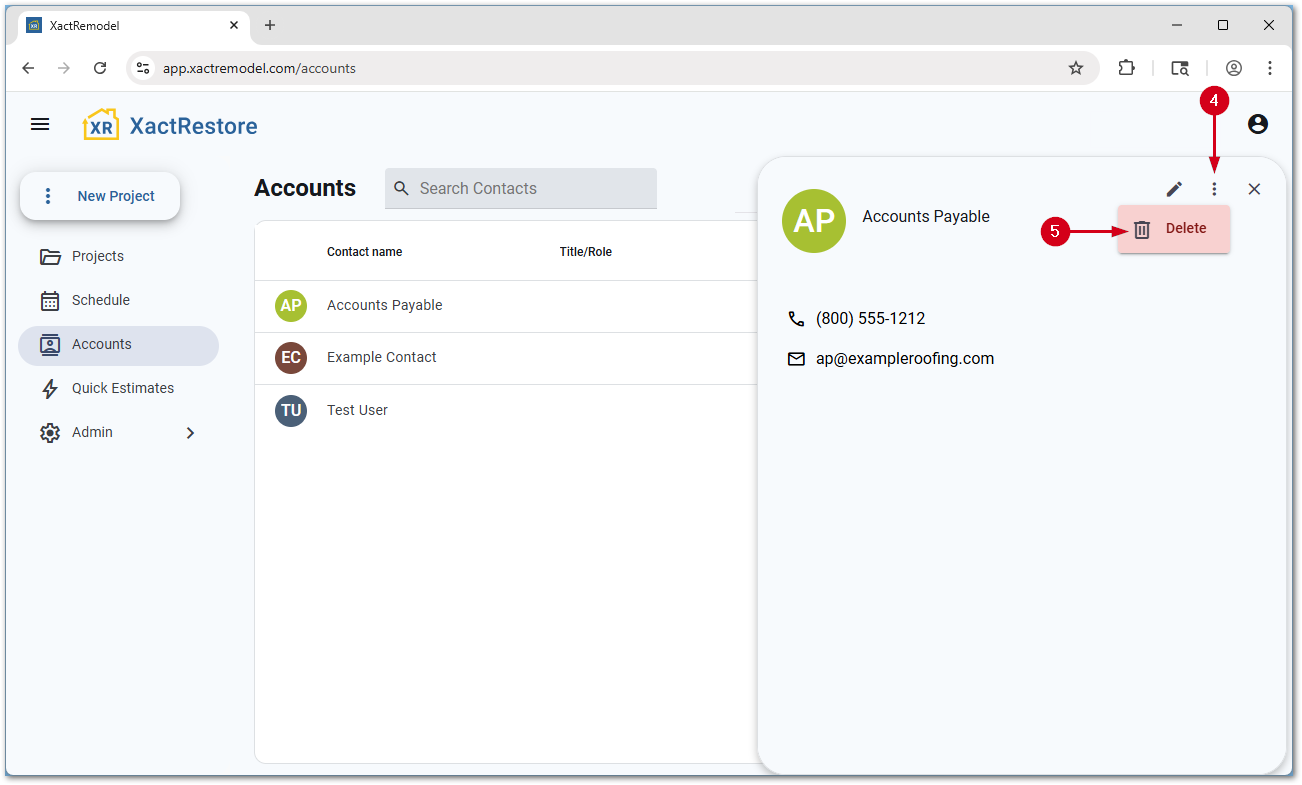
Delete contacts
Follow the steps below to delete contacts.
- Within XactRemodel or XactRestore, select Accounts.
- Select Contacts.
- Select the desired contact.
- Select the menu icon.
- Select Delete. The contact is deleted with no confirmation prompt.
IMPORTANT: A brief message with an undo option appears at the bottom of the page once an account is deleted. When the popup disappears, the contact is no longer recoverable.