Room basics
 Updated
by Russell B.
Updated
by Russell B.
There is an Xactware Xpert Tip that might help with part of this process. After selecting play, select the full-screen icon to make the video full-screen.
See our XpertTips library for more Xpert Tips.
A good estimate starts with a good takeoff. XactRemodel Studio helps you capture those dimensions and make them usable as you build an estimate.
Create rooms
Rooms are created using the room tool, and new rooms can be attached to existing rooms or stand separately. Additionally, you can use the wall tool to create odd-shaped rooms and pony or partial walls.
Place default sized rooms
The default room size in Studio is 12 ft by 12 ft and can be quickly placed by following the steps below.
- Within a project, select Studio.
- Select the Room tool.
Note: Alternatively, press the R key on the keyboard to enable the room tool.- Select the location on the Studio canvas to place the room.

Draw a specific size room
Selecting and dragging lets you quickly draw a room to your desired size.
- Within a project, select Studio.
- Select the Room tool.
Note: Alternatively, press the R key on the keyboard to enable the room tool.- Select and drag the room to the desired size.
Note: As soon as you release the mouse button, the room is placed on the Studio canvas.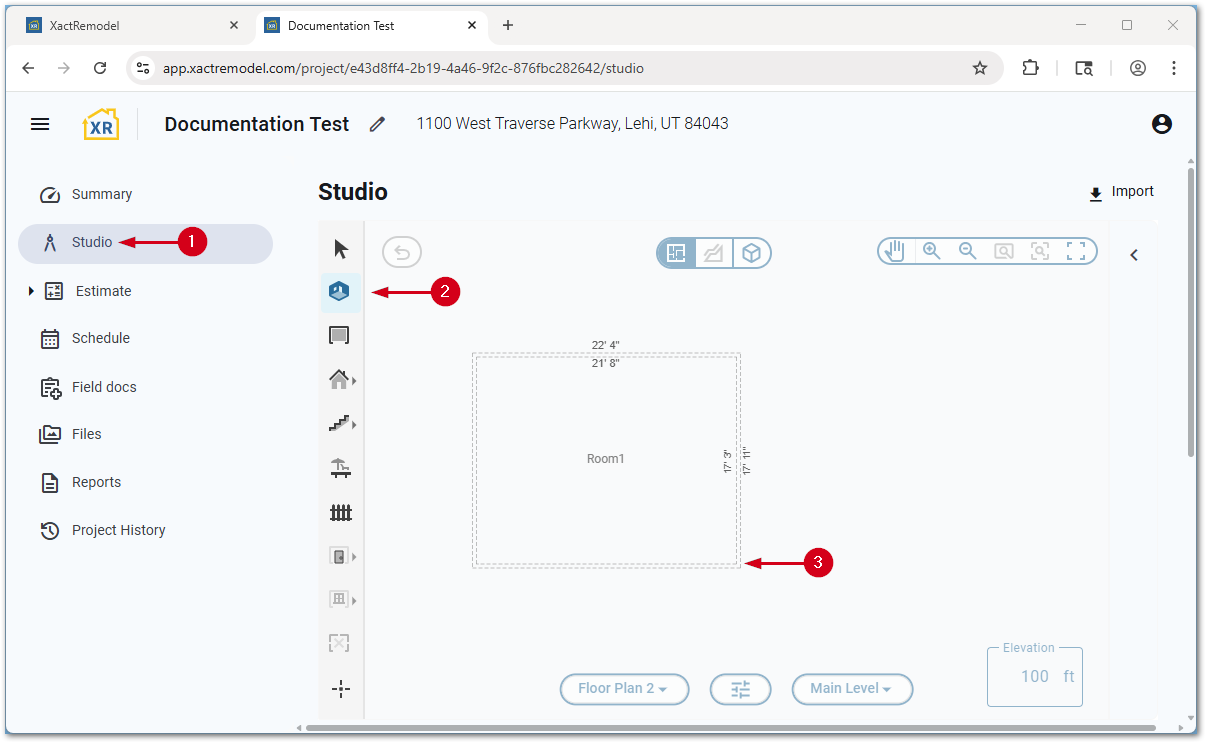
Resize rooms
By dragging a wall
Dragging a wall allows you to either resize a room or quickly create an adjacent room.
- Within Studio, select the wall to move.
- Select and drag the double arrow icon to the desired location.

To only resize the room and not create a new room, select a whitespace on the Studio canvas to save.

To create a new room from the remaining space, select the plus icon.

By editing a dimension
For more precise resizing, dimensions are editable.
Note: If measurements are not visible, press the Shift and M keys on the keyboard to make them visible.
- Within Studio, select the measurement to edit.

- Enter the new measurement.
Note: Feet and inches can be separated with a comma, or decimal measurements can be used. For example, five feet 6 inches can be entered as 5,6 or 5.5.- Select a white space on the Studio canvas to save.

By dragging a vertex
Oddly shaped rooms can be created by dragging vertices.
Note: By default, vertices are at each corner; however, additional ones can be added as desired. See our Vertex tool document.
- Within Studio, select the desired vertex.

- Select and drag to the desired shape or location.
Note: To prevent angle snapping, press and hold the Shift key while dragging the vertex.
By using the Square Break tool
For assistance using the Square Break tool, see our Square Break tool document.