Getting Started
Frequently Asked Questions (FAQ)
System Requirements
Company Info
Add Company Markup
My Pricing
Line Item and Pricing Data
Create Report Statements
Create a Project
Contact Support
XactRemodel subscription levels
XactRemodel Mobile App
Unable to view Quick Estimates
Admin Users Control
Accounts and Contacts
Manage client and vendor Accounts in XactRemodel
Manage Contacts in XactRemodel
Associate projects with Accounts in XactRemodel
Projects
Project Overview
Project Summary
Duplicate a Project
Reprice an Estimate
Sending Projects to Direct Supplier
XactRemodel Mobile: Import Contacts
Project History
Restoring Deleted Projects
Groups
Line Items
Studio
Getting Started
About Studio
Share floor plan in XactRemodel
Building an Estimate
Import image as underlay
Level Properties
Multiple Floor Plans in Studio
Reference Objects
Tools
View Levels in 3D
Working with Levels
3D View
Rename a sketch in XactRemodel and XactRestore Studio
Framing in Studio
Rooms
Openings
Roofs
Add line items from within Studio
Scheduling
Schedule Work Week Setup
Adding Tasks to your Project Schedule
Company Schedule
Task Report in Scheduling
Schedule Views
Creating a Project Schedule with Auto-Scheduling
Attachments
Manage attachments in Proposal reports
Manage photos and documents in XactRemodel and XactRestore
Attachments
Reports
Integrations
Release Notes
January 2025 New Features
Upcoming Features
November 2024 New Features
June 2024 New Features
February 2024 New Features
2023 Release Notes
November 2023 New Features
September 2023 New Features
XactRemodel PRO Release
November 2025 New Features
Account management
How do I cancel or change my subscription?
Account Deletion
Subscribe to XactRemodel
Updating Account Info
Transferring from XactRemodel Desktop
Import projects from XactRemodel desktop
Transfer data from XactRemodel Desktop to Xactimate
Back up your data in XactRemodel Desktop
XactRestore
Field docs
Field docs - Admin
Field docs initial job setup
Add levels in Field docs
Add rooms in Field docs
Add equipment in Field docs
Reporting in Field docs
Field Docs completion and final review
Take daily readings in Field docs
Pick up equipment in Field docs
XactRestore now available!
Set project dates
Type of Loss
Import Xactimate estimates (ESX) in to XactRemodel and XactRestore
Manage users and roles in XactRemodel and XactRestore
Lead creation in XactRestore Pro
Adjustments in XactRemodel and XactRestore
- All Categories
- Studio
- Rooms
- Sub-Rooms
Sub-Rooms
Updated
by Rose Gulley
A sub-room is a subgroup of a room or a room within a room.
Sub-rooms are useful because anything that is applied to the parent room in which the sub-room is grouped is also applied to the sub-room. This makes the process of applying identical line items a much faster and more efficient process.
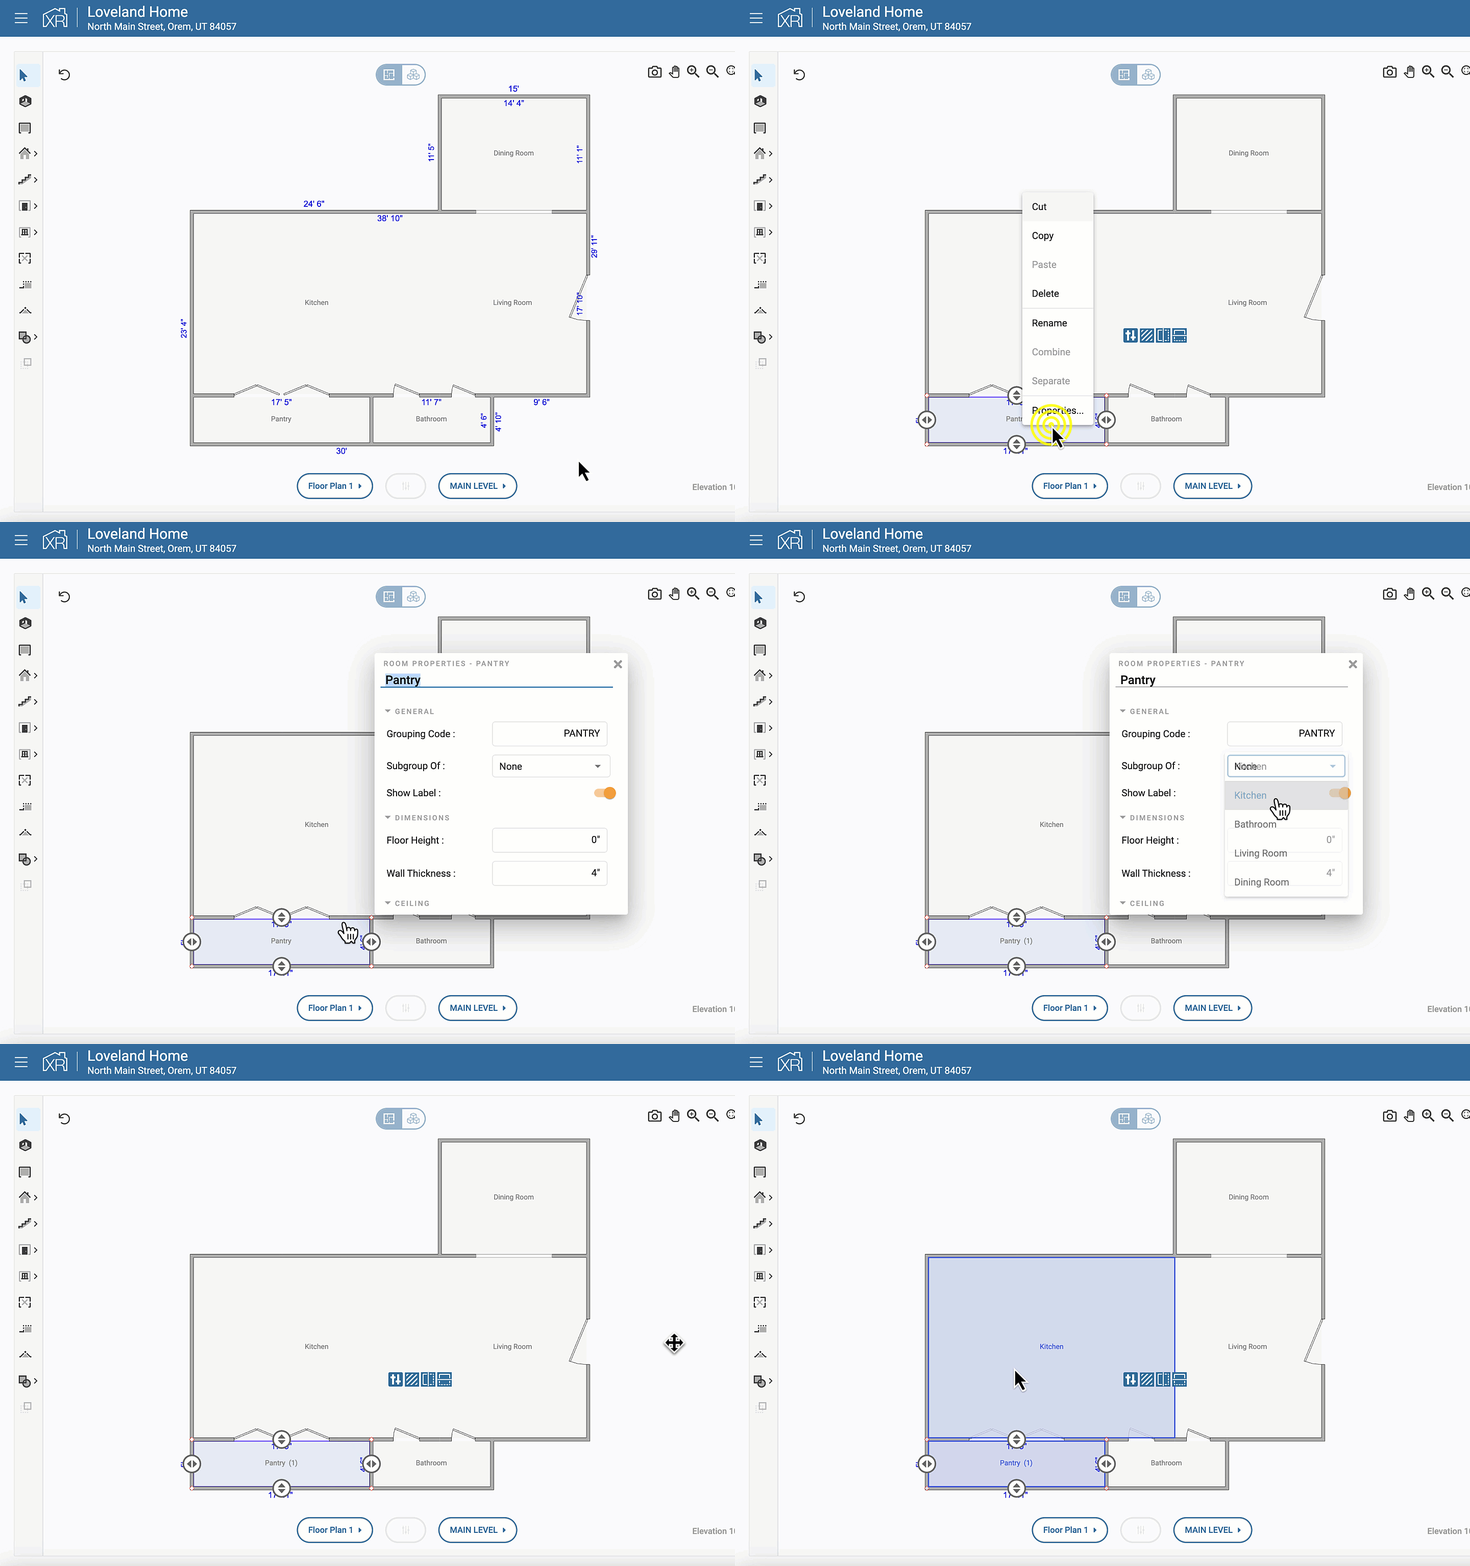
How to Add a Sub-Room in Studio
- In Studio, select a room and click on the Properties icon, or right-click on the room that is going to become a sub-room and select Properties.
- Click the 'Subgroup Of' dropdown in the General menu and select the name of the room that will be the parent room.
- Click anywhere outside of the window to exit and apply these changes.

Now, when hovering over the parent room, the sub-room(s) will be highlighted along with the parent room. You will also notice that the sub-room is no longer listed under the Estimate menu within the navigation bar on the left.
How to Separate a Sub-Room in Studio
- In Studio, right-click on the sub-room that is to be separated.
- Click Separate.
- Click Accept to confirm separation.
As you can see, the parenthesis with the number has disappeared indicating that the room is no longer a sub-room.
